Top Secrets and Pointers to Get Clean Air Vents Like a Pro
Have you ever wondered why, even after cleaning your house, the air in your ceiling seems dusty? Do you sneeze and wonder whether your vents are causing your allergies? In that situation, clean air vents are required. Most homeowners do not pay much attention to this, but it can help a lot in improving the quality of the intrapersonal environment, reducing the number of allergens and even making your HVAC system last longer in case you get clean air vents regularly.
The most advantageous part of this is that you need not pay a professional each and every time; you can actually learn the professional cleaning of air vents and enjoy the fresh and clean air flowing through your home. We will go step by step and find out how to clean air vents in the most effective manner.
1. Gather Your Cleaning Tools
Preparation makes the entire work easy. Nothing is required to clean air vents, according to bond cleaning Upper Coomera. Take off vent covers with a screw driver, hose attachment vacuum cleaner, wipe down with a microfiber cloth or soft brush and wash with a mild soap solution. Have a bucket of warm water to wash with; never forget to put on the disposable gloves and dust mask to avoid breathing in the mud. With all these supplies ready, you will not waste time going around the place after you start. Rather, think about assembling your collection of tools before you plan to work on a project at home. It is much easier.
2. Turn Off the HVAC System
It is always good to turn off your heating or cooling system before you touch the vents. It may be a minor step; however, it is extremely important when you want to clean air vents safely. When you are cleaning your home, the dust and debris can be pushed around your home by a running HVAC system, reversing the effort you have put in. It may also be unsafe as you will be working at the duct openings. Always make sure to switch the system off so that the cleaning is more effective and controlled.
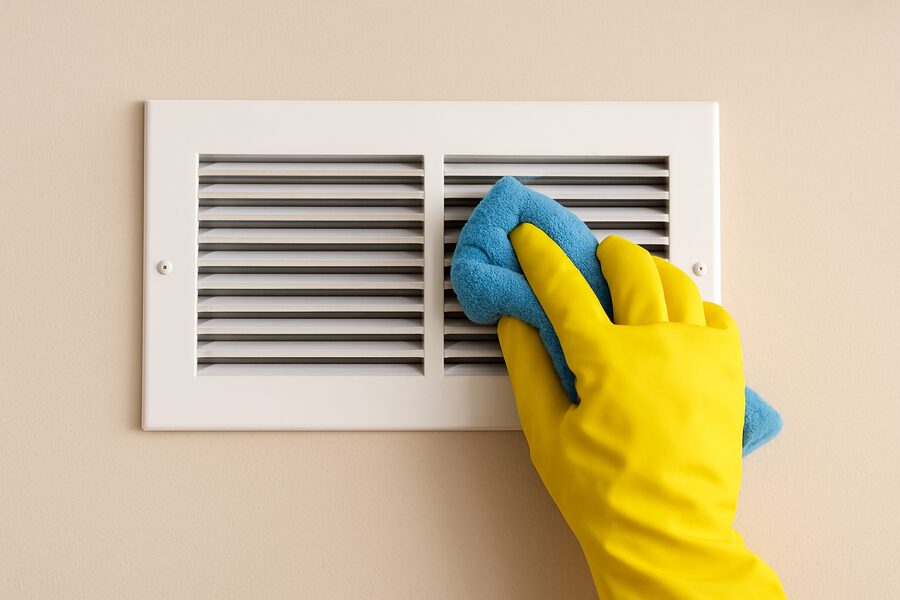
3. Wipe out and Dry Clean the Vent Covers
The first line of defence between your house and the ducts is the vent covers, which have a tendency to become extremely dusty, dirty, and grimy. Take them out with your screwdriver. When they come off, put them in warm, soapy water to loosen the accumulation. Allow to soak for 10 minutes and scrub using a soft brush. By doing this, you will not ruin the material in the process of cleaning deeply. Run them under a lot of water and leave them to dry. Dust-free covers are essential when you plan to clean air vents inside and out.
4. Vacuum Inside the Vents
The covers have been removed at this point, so now it is time to address the ducts themselves. Connect the hose to your vacuum cleaner and then very carefully insert it into a vent hole. Shake it up to dust it off, get rid of pet hair and any other loose materials that may be inside. To clean in greater detail, insert a brush to loosen the particles that remain. Vacuum cleaning is considered one of the most effective methods of clean air vents since it does not blow back the dirt into your house. Once this is done, you will notice that the air will flow better.
5. Wipe Down the Vents
Loose dust is removed by vacuuming, and sticky grime sometimes remains along the edges of the vents. Wipe inside and around vent openings with a microfiber cloth that is dipped in mild cleaning solution. This will make sure that there is no residue on any corner. Wiping frequently will help to eliminate accumulation and will make clean air vents easier later. For spotless results on floors and surfaces, you can also try spray mop cleaning. And this step will also give you that polished finish that makes your vents look clean and well-maintained.
6. Secure Vent Covers-Replace
Once the vent covers are dry, the screwdriver should be returned. Make sure that they sit in place to prevent air leakage, which affects the efficiency of your HVAC. This is the last thing you do for clean air vents, as it makes them appear clean but also makes sure your system works correctly. Your vents will also provide healthier and cleaner air into your living areas with clean covers and ducts.
7. Don’t Forget the Air Filters
Although clean air vents may be your priority, you might forget to clean your air filters, and all your effort may go to waste. The filters block dust, dirt and allergens, and when they are blocked, they force the dust particles into your house. Install expendable filters or clean reusable filters, one to three times a month. Together with clean vents, clean filters ensure the highest productivity and improved indoor air quality. This step is crucial and should be taken; otherwise, half the work is done.
8. Clean on a Routine Basis
It is better to clean your vents once and consistently. Experts recommend clean air vents at least 2 times a year (or more often) in case you live in a dusty place, have pets, and are allergic. This is something you do every season during cleaning, hence you will always have cleaner air to breathe. In the long run, this habit will save health problems, save you energy, and your HVAC system can even last longer. You can also consider scheduling a deep bond clean for thorough results.
Conclusion
There is no need to get lost in learning how to clean air vents like a pro. It doesn’t take much planning, the correct equipment, or a daily habit to transform your indoor air and create a healthier environment in your home. The reduction in allergens to energy reduction are just a few of the benefits that are worth the effort. And, keep in mind you are not only keeping one of the parts of your home tidy, but also investing in your health, comfort, and well-being when you clean air vents. So why wait? Get your tools and treat your vents like they should be treated today.
Related Posts
7 Cleaning Red Flags Property Managers Notice Fast
Cleaning Red Flags Property Managers Notice Fast Have you ever thought to yourself, “Why is…
Fast and Smooth Tips to Take the Sticky Glue off Wood
Sticky Glue Off Wood Quickly – Fast & Smooth Removal Tips Did you ever imagine…
Which Method Is Best for Cleaning Your Home Drains?
Which Method Is Best for Cleaning Your Home’s Drains? Have you not been standing at…